Created page with "<bookshelf src="Book:Admin manual" />" |
No edit summary |
||
| (12 intermediate revisions by 3 users not shown) | |||
| Line 1: | Line 1: | ||
<bookshelf src="Book:Admin manual" /> | <bookshelf src="Book:Admin manual" /> | ||
{{DISPLAYTITLE:User manager}} | |||
The extension '''BlueSpiceUserManager''' provides the visual interface for user administration. | |||
==About the User manager== | |||
Administrators can access the User manager in the [[Manual:Extension/BlueSpiceDiscovery#Header bar|Global actions]] menu under ''Administration > Users (''link to page ''Special:UserManager).'' It shows an editable list of all user accounts. | |||
[[File:Manual:Extension BlueSpiceUserManager 1743170306607.png|center|thumb|600x600px|User manager page]] | |||
==Create a user account== | |||
'''To create a user account:''' | |||
#'''Click''' the "+ Add"-button. This opens a dialog.[[File:Manual:Extension BlueSpiceUserManager 1743170419859.png|center|thumb|300x300px|Create a user account]] | |||
#'''Enter''' the user information in the dialog: | |||
#*''Username:'' The username must be unique and cannot contain most special characters (including the <code>@</code>-Symbol). It is reasonable to include common special characters such as period (<code>.</code>) or standard hyphens for hyphenated names (<code>-</code>). Avoid en-dashes (<code>–</code>) or m-dashes (<code>—</code>). ''Password and Confirm password:'' The password for the new user. | |||
#*''Real name:'' The real name can be a duplicate of an existing user's real name and is optional. | |||
#*''Email:'' The email address of the user (optional). | |||
#*''Groups:'' a user can be assigned to multiple groups. If no group is selected, the user belongs to the default group ''user''. | |||
#Click '''Save''' to create the user account. | |||
{{Messagebox|boxtype=tip|icon=|Note text=If you do not want to provide the new user with a password that is known to you, you can create the user account via the page ''Special:CreateAccount'' instead. It is, however, not possible to assign a user group to the new account during account creation on that page.|bgcolor=}} | |||
=== Invite user === | |||
A user account can also be created via an invitation. This allows users to choose their own username and password. The accounts are automatically created in the "user" group. User groups can be set for multiple users at the same time by selecting the users and clicking on the "groups" icon above the grid. This resets the groups for the selected users and assigns the newly chosen groups. | |||
==Edit a user account== | |||
[[File:Manual:Extension BlueSpiceUserManager 1743170640214.png|center|thumb|600x600px|Edit a user account]] | |||
By selecting one or more users in the list, two options are available above the list of users: | |||
* ''Edit groups:'' Assign groups to these user account(s) | |||
* ''Block users:'' Disable/enable user accounts. A user account cannot be deleted. | |||
In addition, some functions are available for each individual user on the right on the table: | |||
*''Pen icon:'' Edit real name, email or groups | |||
*''Change password:'' Change the password. | |||
*''Block user:'' Disable/enable user account. A user account cannot be deleted. | |||
{{Messagebox|boxtype=tip|Note text=User groups can be set for multiple users at the same time by selecting the users and clicking on the "groups" icon above the grid. This resets the groups for the selected users and assigns the newly chosen groups.}} | |||
==Inactive users== | |||
[[File:Manual:Extension BlueSpiceUserManager 1743171139789.png|center|thumb|600x600px|View inactive users]] | |||
By default, the list displays users with active user accounts (enabled). | |||
To view inactive users, click on "Show blocked users". | |||
{{Messagebox|boxtype=note|icon=|Note text=User accounts cannot be deleted. They can only be disabled.|bgcolor=}} | |||
== Subscription key == | |||
The number of users displayed depends on which subscription key is entered in the [[Manual:Extension/BlueSpiceConfigManager|configuration management]] under ‘System’ in the ‘BlueSpiceProDistributionConnector’ area. If the entry is empty, please contact your project manager. Deactivated users are not counted in the number of subscriptions used. | |||
{{translation}} | |||
[[Category:Permissions]] | |||
Latest revision as of 14:39, 11 May 2026
The extension BlueSpiceUserManager provides the visual interface for user administration.
About the User manager
Administrators can access the User manager in the Global actions menu under Administration > Users (link to page Special:UserManager). It shows an editable list of all user accounts.

Create a user account
To create a user account:
- Click the "+ Add"-button. This opens a dialog.
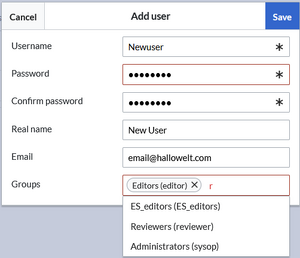
Create a user account - Enter the user information in the dialog:
- Username: The username must be unique and cannot contain most special characters (including the
@-Symbol). It is reasonable to include common special characters such as period (.) or standard hyphens for hyphenated names (-). Avoid en-dashes (–) or m-dashes (—). Password and Confirm password: The password for the new user. - Real name: The real name can be a duplicate of an existing user's real name and is optional.
- Email: The email address of the user (optional).
- Groups: a user can be assigned to multiple groups. If no group is selected, the user belongs to the default group user.
- Username: The username must be unique and cannot contain most special characters (including the
- Click Save to create the user account.

Invite user
A user account can also be created via an invitation. This allows users to choose their own username and password. The accounts are automatically created in the "user" group. User groups can be set for multiple users at the same time by selecting the users and clicking on the "groups" icon above the grid. This resets the groups for the selected users and assigns the newly chosen groups.
Edit a user account

By selecting one or more users in the list, two options are available above the list of users:
- Edit groups: Assign groups to these user account(s)
- Block users: Disable/enable user accounts. A user account cannot be deleted.
In addition, some functions are available for each individual user on the right on the table:
- Pen icon: Edit real name, email or groups
- Change password: Change the password.
- Block user: Disable/enable user account. A user account cannot be deleted.
Inactive users

By default, the list displays users with active user accounts (enabled).
To view inactive users, click on "Show blocked users".
Subscription key
The number of users displayed depends on which subscription key is entered in the configuration management under ‘System’ in the ‘BlueSpiceProDistributionConnector’ area. If the entry is empty, please contact your project manager. Deactivated users are not counted in the number of subscriptions used.