Created page with " {{DISPLAYTITLE: Insert images}} ==How to insert an image on a page== In addition to text, images are probably the most important components of typical content pages. With Vis..." |
No edit summary |
||
| (18 intermediate revisions by 2 users not shown) | |||
| Line 1: | Line 1: | ||
{{DISPLAYTITLE: Insert images}} | {{DISPLAYTITLE: Insert images}} | ||
==How to insert an image on a page== | ==How to insert an image on a page== | ||
In addition to text, images are probably the most important components of typical content pages. With VisualEditor, the images can be uploaded, inserted and formatted all in one step. Images are inserted via the menu item ''Insert > | In addition to text, images are probably the most important components of typical content pages. With VisualEditor, the images can be uploaded, inserted and formatted all in one step. Images are inserted via the menu item ''Insert (+) > Images and media''. | ||
[[File: | [[File:Manual:Ve insert.png|alt=Insert menu options of the visual editor|center|thumb|200x200px|Insert media]] | ||
You can search for an existing image or upload a new image. | |||
The dialog box ''Media Settings'' opens. | === Uploading an image === | ||
After selecting your image, click "Upload". The dialog box ''Media Settings'' opens. | |||
# '''Select''' an image from your local drive. | |||
# '''Click''' ''Upload''.[[File:media_settings_1.0.png|alt=Media settings for uploading an image to the main namespace without further settings|center|thumb|385x385px|Media settings dialog]] | |||
# '''Provide''' the information in the dialog as needed.[[File:Manual:ve media dialog details.png|alt=Media settings dialog with an image selected for upload|center|thumb|408x408px|Media settings]] | |||
#* '''Target namespace:''' The picture can be assigned directly to a namespace. The access rights of the namespace are also applied to the image. This means that only users with access to the namespace can view the image on the wiki. | |||
#*'''Name:''' Choose a name that makes it easy to find the image later during an image search. Or simply leave the current file name. | |||
#*'''Description:''' The description is mainly useful for photos or infographics when the image name does not adequately describe the image content. | |||
#*'''Categories:''' Here, the picture can be assigned to categories. | |||
# '''Click''' ''Save''. The image is now uploaded to the wiki. | |||
'''Error message when saving''': If the image already exists, an error message is displayed. In this case, you need to upload a new version from the file versioning page of the image or rename the new image if both images should be used in the wiki.{{Filename}} | |||
=== | === Image search === | ||
Instead of uploading a new image, you can select an already uploaded image. | |||
*''' | * '''Search tab:''' The search tab shows the images that were last uploaded by you. Entering a search term searches all uploaded files and displays the best matches for your search term first. | ||
* '''Advanced search:''' The advanced search allows to search for images and to filter by some additional image properties. | |||
*''' | |||
===General settings=== | |||
In the general settings, the image descriptions are added.[[File:media_settings_3.0.png|alt=General settings with a caption an the alternative text for the image|center|thumb|344x344px|General settings]] | |||
'''Caption:''' The caption is shown with framed images and thumbnails. Note: If you change an image to frameless and then back to "framed", you need to re-enter the caption. | '''Caption:''' The caption is shown with framed images and thumbnails. Note: If you change an image to frameless and then back to "framed", you need to re-enter the caption. | ||
| Line 37: | Line 36: | ||
===Advanced settings=== | ===Advanced settings=== | ||
In the advanced settings, you can set the position (image alignment), image type, image width and image height. | |||
In the advanced settings, you can set the position and image | |||
The following settings are possible: | The following settings are possible: [[File:media_settings_4.0.png|alt=Advanced settings example values|center|thumb|309x309px|''Advanced settings: position (image alignment), image type'', ''image width'' and ''image height'']] | ||
*'''Position:''' | *'''Position:''' | ||
**Wrap text around this item: | **Wrap text around this item: If unchecked, the image is left-aligned between two paragraphs. If checked, one of the following positions can be selected: | ||
***''Left:'' The image is displayed on the left side of the text | ***''Left:'' The image is displayed on the left side of the text. The content surrounds the image. | ||
***''Center:'' The image is displayed centered | ***''Center:'' The image is displayed centered between two paragraphs. | ||
***''Right:'' The image is displayed to the right of the text | ***''Right:'' The image is displayed to the right of the text. The content surrounds the image. | ||
*'''Image type''': If you insert an image with VisualEditor, the image is usually linked to the Media Viewer. To suppress the link on an image, you must add an empty link attribute to the image tag in the source code: | *'''Image type''': If you insert an image with VisualEditor, the image is usually linked to the Media Viewer. To suppress the link on an image, you must add an empty link attribute to the image tag in the source code: | ||
| Line 54: | Line 52: | ||
{| class="wikitable" | {| class="wikitable" | ||
|+ | |+ | ||
!Image type | ! style="" |Image type | ||
!Output | ! style="" |Output | ||
!Description | ! style="" |Description | ||
|- | |- | ||
|Thumbnail | | style="" |Thumbnail | ||
|[[File:Bild.jpg|alt= | | style="" |[[File:Bild.jpg|alt=Image type "thumbnail"|centre|thumbnail|This is the caption]] | ||
|The preview picture shows the image with a standard width of 300px. The width can be adjusted as required. | | style="" |The preview picture shows the image with a standard width of 300px. The width can be adjusted as required. | ||
In addition, the caption is displayed below the picture. A preview icon indicates that the image can be viewed in a larger size. | |||
|- | |- | ||
|Frameless | | style="" |Frameless | ||
|[[File:Bild.jpg | | style="" |[[File:Bild.jpg|centre|frameless|alt=Image type "frameless"]] | ||
|The frameless version shows the picture without a frame. The width can be adjusted as required (here we set the example to 300px). | | style="" |The frameless version shows the picture without a frame. The width can be adjusted as required (here we set the example to 300px). | ||
The caption does not appear below the picture. | The caption does not appear below the picture. | ||
| Line 75: | Line 73: | ||
However, the image size and position can be adjusted as needed. | However, the image size and position can be adjusted as needed. | ||
|- | |- | ||
|Frame | | style="" |Frame | ||
|[[File:Bild.jpg | | style="" |[[File:Bild.jpg|none|enframed|This is the image caption|link=https://de.wiki.bluespice.com/wiki/Datei:Bild.jpg|alt=Image type "frame"]] | ||
|The framed version is similar to the preview picture. Compared to the preview, the magnifying glass symbol is not displayed and the image is inserted on the page full-size. | | style="" |The framed version is similar to the preview picture. Compared to the preview, the magnifying glass symbol is not displayed and the image is inserted on the page full-size. | ||
The size cannot be adjusted. | The size cannot be adjusted. | ||
|- | |- | ||
|Basic | | style="" |Basic | ||
|[[File:Bild.jpg|300x300px| | | style="" |[[File:Bild.jpg|300x300px|alt=Image type "Basic"]] | ||
|The basic version is like the frameless version. | | style="" |The basic version is like the frameless version. | ||
By default, text does not wrap, but the text is separated at the point where the image was inserted. | By default, text does not wrap, but the text is separated at the point where the image was inserted. | ||
| Line 90: | Line 88: | ||
|} | |} | ||
*'''Border:''' To enable or disable the borders on this picture | |||
*'''Image size:''' | *'''Image size:''' | ||
**''Standard:'' sets the image width to 300px (unless the standard width has been changed in the [[Manual:Preferences|user preferences]]). | **''Standard:'' sets the image width to 300px (unless the standard width has been changed in the [[Manual:Preferences|user preferences]]). | ||
**''Custom:'' allows setting a custom size. | **''Custom:'' allows setting a custom size. | ||
**''Make full size:'' resets the size to the actual image size. | **''Make full size:'' resets the size to the actual image size. '''Note:''' An image cannot be set to a larger dimension than the actual image dimension. | ||
== Inserting images with drag-and-drop == | |||
In visual edit mode, an image can be dragged directly from the file folder into the wiki with the mouse. It is important that the position for inserting the image shows a horizontal line before you drop the image. Otherwise the image will not be uploaded or inserted. | |||
[[File:drag and drop.png|alt=Drag and drop screenshot|center|thumb|650x650px|Line indicating the insert position during drag-and-drop]] | |||
=== Drag-and drop settings === | |||
The standard image settings that should be applied when placing an image via drag-and-drop can be adjusted in the [[Manual:Extension/BlueSpiceConfigManager#EnhancedUpload v4.3+|Config Manager.]] | |||
==Images and namespaces== | ==Images and namespaces== | ||
| Line 105: | Line 111: | ||
'''Same image with different version:''' If you want to use a new version of the same image, open the "Special:Upload file" page in a new browser tab (so that you don't lose any changes on your wiki page). There, you can save already existing pictures with the same name again. The original image is kept as a version. | '''Same image with different version:''' If you want to use a new version of the same image, open the "Special:Upload file" page in a new browser tab (so that you don't lose any changes on your wiki page). There, you can save already existing pictures with the same name again. The original image is kept as a version. | ||
== Display images as a gallery == | |||
Images can also be displayed in gallery format on a page. You can find the documentation for this at https://www.mediawiki.org/wiki/Help:Images/en#Rendering_a_gallery_of_images | |||
[[en:{{FULLPAGENAME}}]] | [[en:{{FULLPAGENAME}}]] | ||
[[de:VisualEditor/Bilder]] | [[de:Handbuch:Erweiterung/VisualEditor/Bilder]] | ||
[[Category:Editing]] | [[Category:Editing]] | ||
[[Category:Getting started]] | [[Category:Getting started]] | ||
Latest revision as of 11:34, 26 May 2025
How to insert an image on a page
In addition to text, images are probably the most important components of typical content pages. With VisualEditor, the images can be uploaded, inserted and formatted all in one step. Images are inserted via the menu item Insert (+) > Images and media.

You can search for an existing image or upload a new image.
Uploading an image
After selecting your image, click "Upload". The dialog box Media Settings opens.
- Select an image from your local drive.
- Click Upload.
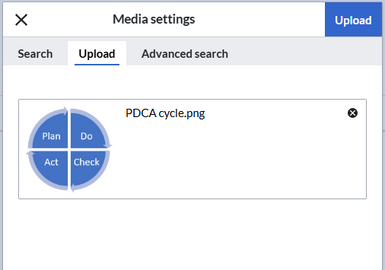
Media settings dialog - Provide the information in the dialog as needed.
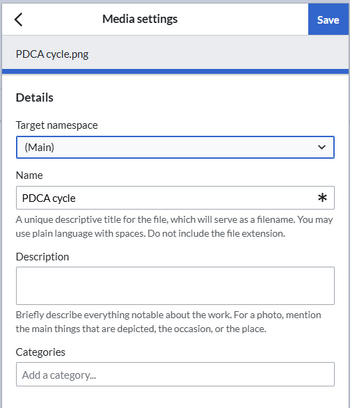
Media settings - Target namespace: The picture can be assigned directly to a namespace. The access rights of the namespace are also applied to the image. This means that only users with access to the namespace can view the image on the wiki.
- Name: Choose a name that makes it easy to find the image later during an image search. Or simply leave the current file name.
- Description: The description is mainly useful for photos or infographics when the image name does not adequately describe the image content.
- Categories: Here, the picture can be assigned to categories.
- Click Save. The image is now uploaded to the wiki.


Error message when saving: If the image already exists, an error message is displayed. In this case, you need to upload a new version from the file versioning page of the image or rename the new image if both images should be used in the wiki.
Image search
Instead of uploading a new image, you can select an already uploaded image.
- Search tab: The search tab shows the images that were last uploaded by you. Entering a search term searches all uploaded files and displays the best matches for your search term first.
- Advanced search: The advanced search allows to search for images and to filter by some additional image properties.
General settings
In the general settings, the image descriptions are added.

Caption: The caption is shown with framed images and thumbnails. Note: If you change an image to frameless and then back to "framed", you need to re-enter the caption.
Alternate text: The alternate text should be entered for each image since it replaces the image in certain contexts. For example, this so-called "alt" text is used by users who work with screen readers. Screen readers are used by users with visual limitations, but search engines can also read this text. In some business areas, the indication of the "alt" text is also required by law. If you are not sure, ask your company accordingly.
Advanced settings
In the advanced settings, you can set the position (image alignment), image type, image width and image height.
The following settings are possible:

- Position:
- Wrap text around this item: If unchecked, the image is left-aligned between two paragraphs. If checked, one of the following positions can be selected:
- Left: The image is displayed on the left side of the text. The content surrounds the image.
- Center: The image is displayed centered between two paragraphs.
- Right: The image is displayed to the right of the text. The content surrounds the image.
- Wrap text around this item: If unchecked, the image is left-aligned between two paragraphs. If checked, one of the following positions can be selected:
- Image type: If you insert an image with VisualEditor, the image is usually linked to the Media Viewer. To suppress the link on an image, you must add an empty link attribute to the image tag in the source code:
- frameless picture with link (standard):
[[File:adult-chair-company-380769.jpg|frameless]] - frameless picture without link:
[[File:adult-chair-company-380769.jpg|frameless|link=]]
- frameless picture with link (standard):
| Image type | Output | Description |
|---|---|---|
| Thumbnail |  |
The preview picture shows the image with a standard width of 300px. The width can be adjusted as required.
|
| Frameless | |
The frameless version shows the picture without a frame. The width can be adjusted as required (here we set the example to 300px).
The caption does not appear below the picture. By default, the image is inserted without text wrapping. It will break up a sentence exactly where it is inserted. By default, the image is centered. However, the image size and position can be adjusted as needed. |
| Frame |  |
The framed version is similar to the preview picture. Compared to the preview, the magnifying glass symbol is not displayed and the image is inserted on the page full-size.
The size cannot be adjusted. |
| Basic |
|
The basic version is like the frameless version.
By default, text does not wrap, but the text is separated at the point where the image was inserted. The image is inserted in full width, while the frameless image is inserted in miniature image width (300px). The size can be adjusted. |
- Border: To enable or disable the borders on this picture
- Image size:
- Standard: sets the image width to 300px (unless the standard width has been changed in the user preferences).
- Custom: allows setting a custom size.
- Make full size: resets the size to the actual image size. Note: An image cannot be set to a larger dimension than the actual image dimension.
Inserting images with drag-and-drop
In visual edit mode, an image can be dragged directly from the file folder into the wiki with the mouse. It is important that the position for inserting the image shows a horizontal line before you drop the image. Otherwise the image will not be uploaded or inserted.

Drag-and drop settings
The standard image settings that should be applied when placing an image via drag-and-drop can be adjusted in the Config Manager.
Images and namespaces
You can save pictures and files in the general namespace (pages). If pictures should be accessible by all users, you can save these pictures in the main namespace if other namespaces have access restrictions. If you have created additional namespaces, you can also save images in these namespaces if you have the necessary access rights. Images are then only shown to users who have the necessary read permissions in these namespaces.
In the upload dialog, the namespace field always suggests the namespace of the current page for the image upload.
Changing an embedded image
Different image: In the editing mode of the page, it is possible to edit the image with a double-click. Use the "Change image" button to exchange the image with a different image.
Same image with different version: If you want to use a new version of the same image, open the "Special:Upload file" page in a new browser tab (so that you don't lose any changes on your wiki page). There, you can save already existing pictures with the same name again. The original image is kept as a version.
Display images as a gallery
Images can also be displayed in gallery format on a page. You can find the documentation for this at https://www.mediawiki.org/wiki/Help:Images/en#Rendering_a_gallery_of_images