m (username removed) (log details removed) |
No edit summary |
||
| Line 1: | Line 1: | ||
{{DISPLAYTITLE:PDF export (template customization)}} | {{DISPLAYTITLE:PDF export (template customization)}} | ||
== | == Exporting a page or a book == | ||
To print a page to PDF, click on the page-icon in the page tools. This opens the export dialog field. | To print a page to PDF, click on the page-icon in the page tools. This opens the export dialog field. | ||
| Line 17: | Line 17: | ||
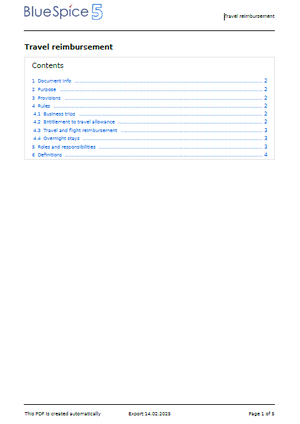
[[File:StandardPDF template.png|alt=PDF page with default header and footer content an a Table of Contents|center|thumb|424x424px|Standard PDF layout]] | [[File:StandardPDF template.png|alt=PDF page with default header and footer content an a Table of Contents|center|thumb|424x424px|Standard PDF layout]] | ||
==Editing the PDF | ==Editing the PDF templates== | ||
You can edit the existing standard PDF or Book PDF template directly in the wiki. In addition to the existing templates, you can add your own custom templates. When printing a page or book, users can choose between these templates. | |||
In addition, each book can be associated with a particular template when it is printed from the Books page. | |||
=== Template elements === | |||
Each template consists of the same elements: | |||
{| class="wikitable" style="width: 100%;" | |||
!Header | |||
|The page header of each PDF page. The basic structure is:<syntaxhighlight lang="html"> | |||
<div class="pdfcreator-runningheaderfix"> | |||
<table> | |||
<tr> | |||
<td> | |||
<div class="pdfcreator-runningheader-logo"> | |||
{{{logo}}} | |||
</div> | |||
</td> | |||
<td> | |||
<h1 class="title">{{{title}}}</h1> | |||
</td> | |||
</tr> | |||
</table> | |||
</div> | |||
</syntaxhighlight> | |||
|- | |||
!Content | |||
|The content layout. The basic structure is:<syntaxhighlight lang="html"> | |||
{{{content}}} | |||
</syntaxhighlight> | |||
|- | |||
!Footer | |||
|The page footer of each PDF page. The basic structure is: | |||
|- | |||
!Document preface | |||
|The cover page. It is meant for the book export, but can also be used for a page export. The basic structure for a book cover page is:<syntaxhighlight lang="text"> | |||
<div class="pdfcreator-intro"> | |||
<div class="pdfcreator-intro-title">{{{title}}}</div> | |||
</div> | |||
</syntaxhighlight> | |||
|- | |||
!Document appendix | |||
|The last page of the PDF export. It has no predefined basic structure. | |||
|- | |||
!Styles | |||
|Style declarations for the CSS classes that are used in any of the template elements. There are no predefined styles. | |||
|- | |||
!Description | |||
| | |||
|} | |||
# Open the page MediaWiki:PDFCreator | === Existing templates === | ||
# Select the template you want to edit.As an example, we select the StandardPDF template. | To edit an existing template: | ||
# Open the page in edit mode. This shows you the current layout of each PDF element. You can click on any tab to switch between the PDF elements you want to customize. | # '''Open''' the page ''MediaWiki:PDFCreator.'' | ||
# Click the ''Help-''button to see the available parameters you can add to each PDF layout section. The parameters with prefix "book" | # '''Select''' the template you want to edit. As an example, we select the ''StandardPDF'' template. | ||
# '''Open''' the page in edit mode. This shows you the current layout of each PDF element. You can click on any tab to switch between the PDF elements you want to customize. | |||
# Click the ''Help-''button to see the available parameters you can add to each PDF layout section. The parameters with prefix "book" are metadata that are defined in books and will not have any effect on pages that are not associated with a book. | |||
== Customization examples for the header and footer == | == Customization examples for the header and footer == | ||
Switch to edit mode on the template pages to make your changes. | Switch to edit mode on the template pages to make your changes. | ||
=== Use a custom logo === | |||
By default, the parameter <code><nowiki>{{{logo}}}</nowiki></code> displays the wiki logo in the PDF. You can also directly reference an uploaded image as your logo for your different PDF templates. Here, we add a custom logo to the header of a template: | |||
# <syntaxhighlight lang="text"> | |||
<div class="pdfcreator-runningheaderfix"> | |||
<table> | |||
<tr> | |||
<td> | |||
<div class="pdfcreator-runningheader-logo"> | |||
[[File:my-logo.png|alt=my logo name]] | |||
</div> | |||
</td> | |||
<td> | |||
<h1 class="title">{{{title}}}</h1> | |||
</td> | |||
</tr> | |||
</table> | |||
</div> | |||
</syntaxhighlight> | |||
=== Print a semantic property === | |||
It is also possible to print a semantic property in the footer. The following example prints the value of the property "Classification" of a page in the PDF footer.<syntaxhighlight lang="text"> | |||
<div class="pdfcreator-runningfooterfix"> | |||
{{#show:{{FULLPAGENAME}}|?Classification}} | |||
</div> | |||
</syntaxhighlight> | |||
=== Add a background color to the header and footer === | === Add a background color to the header and footer === | ||
In the Styles tab, add:<syntaxhighlight lang="css"> | In the Styles tab, add:<syntaxhighlight lang="css"> | ||
/* add a background color to the header and footer */ | /* add a background color to the header and footer */ | ||
| Line 58: | Line 125: | ||
border-top: none !important; | border-top: none !important; | ||
} | } | ||
</syntaxhighlight> | </syntaxhighlight> | ||
Revision as of 15:46, 18 February 2025
Exporting a page or a book
To print a page to PDF, click on the page-icon in the page tools. This opens the export dialog field.
Select the export settings.
- Mode:
- Page: Prints the page.
- Page with subpages: Prints the page and all its subpages. This option is only shown if the page has subpages.
- Page with linked pages: Prints the page and the pages that are linked directly from this page.
- Template:
- StandardPDF: This prints the page or pages without a cover sheet (unless the template has been edited).
- StandardBookPDF: This adds a cover sheet to the PDF (unless the template has been edited).
By default, the template StandardPDF shows the wiki's logo (from the skin settings page). If there are no custom settings, the default BlueSpice logo is used.

Editing the PDF templates
You can edit the existing standard PDF or Book PDF template directly in the wiki. In addition to the existing templates, you can add your own custom templates. When printing a page or book, users can choose between these templates.
In addition, each book can be associated with a particular template when it is printed from the Books page.
Template elements
Each template consists of the same elements:
| Header | The page header of each PDF page. The basic structure is:<div class="pdfcreator-runningheaderfix">
<table>
<tr>
<td>
<div class="pdfcreator-runningheader-logo">
{{{logo}}}
</div>
</td>
<td>
<h1 class="title">{{{title}}}</h1>
</td>
</tr>
</table>
</div>
|
|---|---|
| Content | The content layout. The basic structure is:{{{content}}}
|
| Footer | The page footer of each PDF page. The basic structure is: |
| Document preface | The cover page. It is meant for the book export, but can also be used for a page export. The basic structure for a book cover page is:<div class="pdfcreator-intro">
<div class="pdfcreator-intro-title">{{{title}}}</div>
</div>
|
| Document appendix | The last page of the PDF export. It has no predefined basic structure. |
| Styles | Style declarations for the CSS classes that are used in any of the template elements. There are no predefined styles. |
| Description |
Existing templates
To edit an existing template:
- Open the page MediaWiki:PDFCreator.
- Select the template you want to edit. As an example, we select the StandardPDF template.
- Open the page in edit mode. This shows you the current layout of each PDF element. You can click on any tab to switch between the PDF elements you want to customize.
- Click the Help-button to see the available parameters you can add to each PDF layout section. The parameters with prefix "book" are metadata that are defined in books and will not have any effect on pages that are not associated with a book.
Switch to edit mode on the template pages to make your changes.
Use a custom logo
By default, the parameter {{{logo}}} displays the wiki logo in the PDF. You can also directly reference an uploaded image as your logo for your different PDF templates. Here, we add a custom logo to the header of a template:
<div class="pdfcreator-runningheaderfix">
	<table>
		<tr>
			<td>
				<div class="pdfcreator-runningheader-logo">
					[[File:my-logo.png|alt=my logo name]]
				</div>
			</td>
			<td>
				<h1 class="title">{{{title}}}</h1>
			</td>
		</tr>
	</table>
</div>
Print a semantic property
It is also possible to print a semantic property in the footer. The following example prints the value of the property "Classification" of a page in the PDF footer.
<div class="pdfcreator-runningfooterfix">
	{{#show:{{FULLPAGENAME}}|?Classification}}
</div>
In the Styles tab, add:
/* add a background color to the header and footer */
.pdfcreator-runningheaderfix, .pdfcreator-runningfooterfix {
background-color: #eee;
}
This adds a grey background color.
In the Styles tab, add:
/* remove the border from the header */
.pdfcreator-runningheaderfix > table {
border-bottom: none !important;
}

/* remove the border from the header */
.pdfcreator-runningfooterfix > table {
border-top: none !important;
}
Customization examples for the cover page
The cover page can be changed from the Document preface-tab. It is usually only used for the book template. The default elements are:
- Book title
- Logo
- Cover image: If a cover image is explicitely set by the user, the cover image is printed automatically. It does not have a parameter. The generated preview images on the bookshelf are not printed on the PDF cover.
Using background colors
Instead of using cover images, you can define some designs based on colors.
Here are some examples and the needed source text for the page MediaWiki:UniversalExport/PDF/Default/Cover page.html. To use them, simply overwrite the existing content in that page.
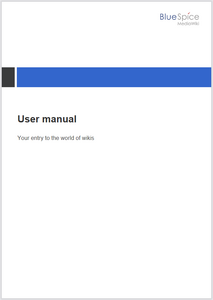
-
Cover page 1
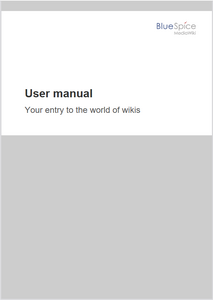
-
Cover page 2
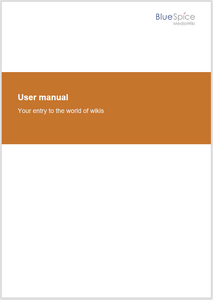
-
Cover page 3
Cover page 1
<!-- Logo -->
<div style="margin:1cm; text-align:right">
{{{logo}}}
</div>
<!-- Color block -->
<div style="position:absolute; height:2cm; width:1.8cm; background-color:#3a3b3c;
margin:4cm 0 0 0;  z-index:-500">
</div>
<div style="position:absolute; height:2cm; width:24cm; background-color:#3366cc;
margin:4cm 0 0 1.8cm;  z-index:-500">
</div>
<!-- Title -->
<div style="font-size:28pt;font-weight:bold;margin:8.5cm 1cm 1cm 1.8cm;color:#333333;">{{{title}}}
</div>
<!-- Subtitle -->
<div style="font-size:16pt; margin:1cm 1cm 1cm 1.8cm; color:#555555">{{{subtitle}}}
</div>
Cover page 2
<div id="coverpage" style="height:29.7cm; width:21cm; margin:-1cm 0 0 -1.5cm;background: #cdcdcd; overflow:hidden;">
<div style="min-height:10cm; background:white; margin:2cm 0 0 0; padding:1cm">
<!-- Logo -->
{| style="width: 100%; text-align: right;"|
|{{{logo}}}
|}
<!-- Titelblock -->
<div style="font-size: 32pt; font-weight:bold; padding:0 1cm; margin:4.5cm 0 0.5cm 0;color:#333333; background:white">{{{title}}}</div>
<div style="font-size: 24pt; margin-top:0; padding:0 1cm; color:#555555;">{{{subtitle}}}
</div>
</div>
Cover page 3
<!-- Logo -->
{| style="width: 100%; text-align: right;"
|{{{logo}}}
|}
<!-- Title block with background color -->
<div style="background-color:#c6752d; margin:4.5cm -2cm 0 -2cm; padding:2cm 2cm 3cm 2cm;">
<div style="font-size: 24pt; font-weight:bold;  margin-bottom:0.5cm; color:#ffffff;">{{{title}}}
</div>
<!-- Subtitle block -->
<div style="font-size: 18pt; margin-top:0.5cm; color:#efefef">{{{subtitle}}}
</div>
</div>


