No edit summary |
No edit summary |
||
| Line 4: | Line 4: | ||
==About the User manager== | ==About the User manager== | ||
Administrators can access the User manager in the [[Manual:Extension/BlueSpiceDiscovery#Header bar|Global actions]] menu under ''Administration > Users (''link to page ''Special:UserManager).'' It shows an editable list of all user accounts. | Administrators can access the User manager in the [[Manual:Extension/BlueSpiceDiscovery#Header bar|Global actions]] menu under ''Administration > Users (''link to page ''Special:UserManager).'' It shows an editable list of all user accounts. | ||
[[File: | [[File:Manual:Extension BlueSpiceUserManager 1743170306607.png|center|thumb|600x600px|User manager page]] | ||
==Create a user account== | ==Create a user account== | ||
'''To create a user account:''' | '''To create a user account:''' | ||
#'''Click''' the "+"-button. This opens a dialog.[[File: | #'''Click''' the "+ Add"-button. This opens a dialog.[[File:Manual:Extension BlueSpiceUserManager 1743170419859.png|center|thumb|300x300px|Create a user account]] | ||
#'''Enter''' the user information in the dialog: | #'''Enter''' the user information in the dialog: | ||
#*''Username:'' must be unique and cannot contain special characters | #*''Username:'' must be unique and cannot contain special characters | ||
#*''Password and Confirm password:'' The password for the new user. | #*''Password and Confirm password:'' The password for the new user. | ||
#*''Real name:'' can be a duplicate of an existing user's real name (optional) | |||
#*''Email:'' The email address of the user (optional) | #*''Email:'' The email address of the user (optional) | ||
#*Groups: a user can be assigned to multiple groups. If no group is selected, the user belongs to the default group ''user''. | |||
#Click '''Save''' to create the user account. | |||
#* Groups: a user can be assigned to multiple groups. If no group is selected, the user belongs to the default group ''user''. | |||
#Click ''' | |||
{{Messagebox|boxtype=tip|icon=|Note text=If you do not want to provide the new user with a password that is known to you, you can create the user account via the page ''Special:CreateAccount'' instead. It is, however, not possible to assign a user group to the new account during account creation on that page.|bgcolor=}} | {{Messagebox|boxtype=tip|icon=|Note text=If you do not want to provide the new user with a password that is known to you, you can create the user account via the page ''Special:CreateAccount'' instead. It is, however, not possible to assign a user group to the new account during account creation on that page.|bgcolor=}} | ||
Revision as of 14:01, 28 March 2025
The extension BlueSpiceUserManager provides the visual interface for user administration.
About the User manager
Administrators can access the User manager in the Global actions menu under Administration > Users (link to page Special:UserManager). It shows an editable list of all user accounts.

Create a user account
To create a user account:
- Click the "+ Add"-button. This opens a dialog.
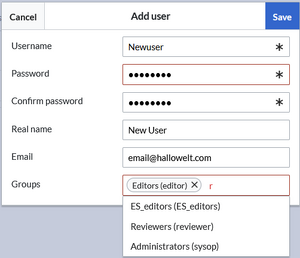
Create a user account - Enter the user information in the dialog:
- Username: must be unique and cannot contain special characters
- Password and Confirm password: The password for the new user.
- Real name: can be a duplicate of an existing user's real name (optional)
- Email: The email address of the user (optional)
- Groups: a user can be assigned to multiple groups. If no group is selected, the user belongs to the default group user.
- Click Save to create the user account.

Edit a user account
The tools for editing a user are shown in the table grid when hovering over or selecting the user from the list.

- Key icon: change the password.
- People icon: Assign groups to this user account.
- Block icon: Disable/enable user account. A user account cannot be deleted.
- Wrench icon: edit email and real name
Inactive users
By default, the list displays users with active user accounts (enabled).
To view inactive users:
- Click on the table header (any column).
- Select "Columns", then select "Enabled". This will add additional column "Enabled" to the grid.
- Click on the header of this column and select Filter > Show all deactivated users.