No edit summary |
No edit summary Tag: 2017 source edit |
||
| Line 16: | Line 16: | ||
<span style="color: rgb(51, 51, 51)">Follow the download instructions.</span> | <span style="color: rgb(51, 51, 51)">'''Follow''' the download instructions.</span> | ||
| Line 24: | Line 23: | ||
{{Hint|file=hint.png|text=In the following steps, we use PHP-Version 7.4.28 which only serves as an example for the latest version 7.4.x that is available at the time of your download.}} | {{Hint|file=hint.png|text=In the following steps, we use PHP-Version 7.4.28 which only serves as an example for the latest version 7.4.x that is available at the time of your download.}} | ||
==Unpacking the zip-archive== | ==Unpacking the zip-archive== | ||
'''Unpack''' the ZIP archive that you just downloaded into a useful system path on your hard drive. | |||
{{Hint|file=hint.png|text=This documentation assumes the [[Setup:Installation Guide/Advanced/Windows_Folder_Structure|recommended folder structure]]. | |||
For this reason PHP will be unpacked into the folder C:\bluespice\bin\php-7.4.28. If you have a different folder structure, you must adapt these paths accordingly.}} | |||
==Setting the environment variable== | ==Setting the environment variable== | ||
To use PHP easily on the command line of Windows, it is necessary to configure an environment variable in Windows. Perform the following steps: | |||
'''Enter''' the key combination Windows+R. | |||
'''Enter''' "SystemPropertiesAdvanced.exe" (1) in the dialog window and '''click''' "OK" (2):[[File:Setup:EnvironmentVariables_01.png|center|400px|Environment variables 02|link=Special:FilePath/Setup:EnvironmentVariables_01.png]] | |||
'''Click''' "Environment Variables...":[[File:Setup:EnvironmentVariables_02.png|center|400px|Environment variables 03|link=Special:FilePath/Setup:EnvironmentVariables_02.png]] | |||
'''Double-click''' the entry "Path" in the section "System variables":[[File:Setup:EnvironmentVariables_03.png|center|400px|Environment variables 04|link=Special:FilePath/Setup:EnvironmentVariables_03.png]] | |||
'''Click''' "New":[[File:Setup:EnvironmentVariables_04.png|center|400px|Environment variables 05|link=Special:FilePath/Setup:EnvironmentVariables_04.png]] | |||
'''Add''' the path to your unpacked PHP version, which contains the php.exe file: | |||
[[File:Setup:php2.png|center|400x400px|Environment variables 06|link=Special:FilePath/Setup:php2.png]] | |||
'''Close''' all newly opened windows one after the other by clicking "OK". | |||
==Checking the environment variable== | ==Checking the environment variable== | ||
To make sure the environment variable is set correctly, perform the following steps: | |||
'''Enter''' the key combination Windows+R. | |||
'''Enter''' "cmd" (1) in the dialog window and '''click''' "OK" (2):[[File:Setup:PHP_EnvironmentVariables_02.png|center|400px|Environment variables 07|link=Special:FilePath/Setup:PHP_EnvironmentVariables_02.png]] | |||
The command prompt opens. | |||
'''Type''' "php -v" (1) and '''press''' the ''Enter'' key. The found PHP version will be displayed (2). | |||
[[File:Setup:php3.png|center|400x400px|Environment variables 08|link=Special:FilePath/Setup:php3.png]] | |||
If this is not the case, then the path to the php.exe file in the environment variables was specified incorrectly. | |||
==Configuring IIS for PHP== | ==Configuring IIS for PHP== | ||
In the following steps, PHP will be included in IIS and IIS will be configured to provide a working basic setup: | |||
'''Press''' the key combination Windows+R to call up IIS Manager. | |||
'''Enter''' "inetmgr" (1) in the dialog window and '''click''' "OK" (2): | |||
[[File:Setup:PHP_IIS_Config_01.png|center|400px|PHP and IIS 01|link=Special:FilePath/Setup:PHP_IIS_Config_01.png]] | |||
'''Select''' your server name (1) in the left pane and then '''double-click''' "PHP Manager" (2): | |||
[[File:Setup:PHP_IIS_Config_02.png|center|400px|PHP and IIS 02|link=Special:FilePath/Setup:PHP_IIS_Config_02.png]] | |||
'''Click''' "Register new PHP version":[[File:Setup:PHP_IIS_Config_03.png|center|400px|PHP and IIS 03|link=Special:FilePath/Setup:PHP_IIS_Config_03.png]] | |||
'''Select''' the browse "(...)" button in the next window: | |||
[[File:Setup:PHP_IIS_Config_04.png|center|400px|PHP and IIS 04|link=Special:FilePath/Setup:PHP_IIS_Config_04.png]] | |||
'''Change''' to the path to which you previously unzipped PHP (1), '''mark''' the "php-cgi.exe" (2) and '''click''' "Open" (3):[[File:Setup:php4.png|center|400x400px|PHP and IIS 05|link=Special:FilePath/Setup:php4.png]] | |||
'''Click''' "OK": | |||
[[File:Setup:php5.png|center|400x400px|PHP and IIS 06|link=Special:FilePath/Setup:php5.png]] | |||
'''Click''' "Configure error reporting":[[File:Setup:PHP_IIS_Config_07.png|center|400px|PHP and IIS 07|link=Special:FilePath/Setup:PHP_IIS_Config_07.png]] | |||
'''Select''' the item "Production machine" (1) and '''enter''' a path and a file of your choice where PHP should save its log (2). '''Click''' "Apply" (3): | |||
[[File:Setup:PHP_IIS_Config_08.png|center|400px|PHP and IIS 08|link=Special:FilePath/Setup:PHP_IIS_Config_08.png]] | |||
{{Hint|file=hint.png|text=This documentation assumes the [[Setup:Installation Guide/Advanced/Windows_Folder_Structure|recommended folder structure]]. If the path you specify here does not yet exist, please create it before clicking "Apply".}} | |||
'''Click''' "Enable or disable an extension" in the main window: | |||
[[File:Setup:systempreparation_php_19.png|border|600px|center|PHP 19|link=Special:FilePath/Setup:systempreparation_php_19.png]] | |||
Make sure that the following extensions are activated: | |||
[[File:Setup:systempreparation_php_20.png|border|600px|center|PHP 20|link=Special:FilePath/Setup:systempreparation_php_20.png]] | |||
To activate an extension, find it in the "Disabled" extensions (1) and '''click''' "Enable" (2): | |||
[[File:Setup:systempreparation_php_21.png|border|600px|center|PHP 21|link=Special:FilePath/Setup:systempreparation_php_21.png]] | |||
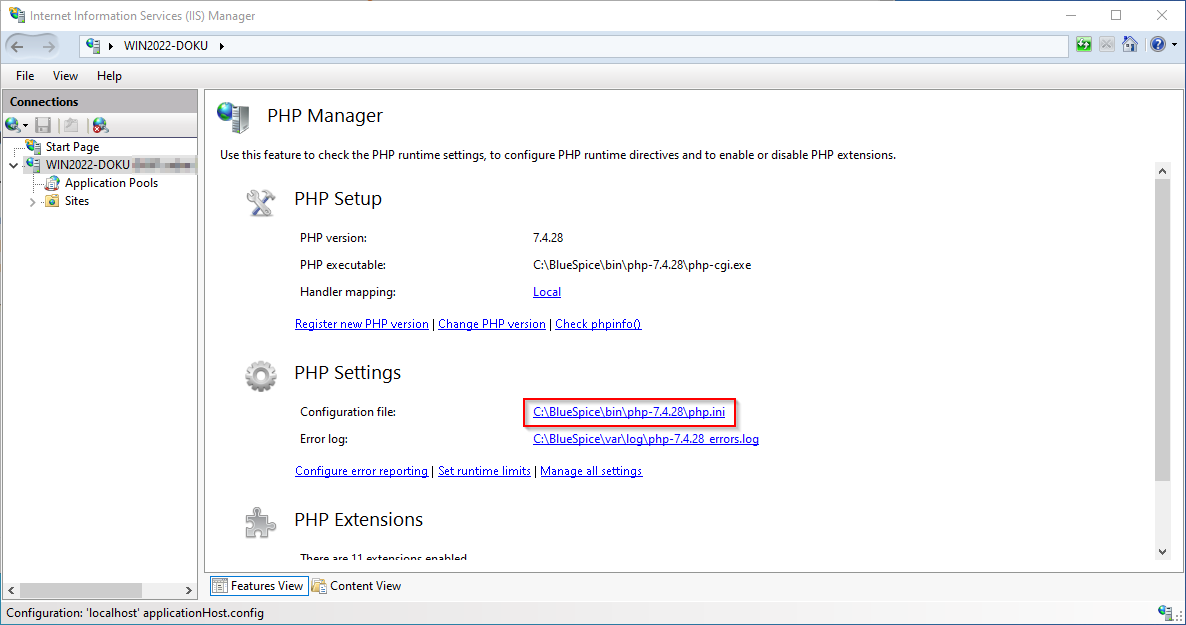
'''Open''' the configuration file ''php.ini'': | |||
[[File:Setup:systempreparation_php_22.png|border|600px|center|PHP 22|link=Special:FilePath/Setup:systempreparation_php_22.png]] | |||
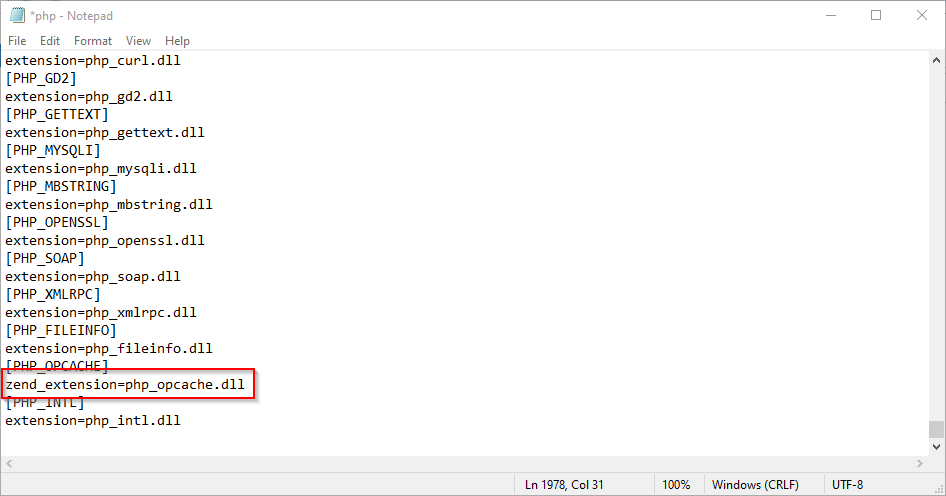
Replace the line <code>extension=php_opcache.dll</code> with <code>zend_extension=php_opcache.dll</code>: | |||
[[File:Setup:systempreparation_php_23.png|border|600px|center|PHP 23|link=Special:FilePath/Setup:systempreparation_php_23.png]] | |||
'''Change''' the following options to the values below: | |||
{| | |||
! style="background-color:#eaeaea;border:1px solid #000;padding:5px;" |Name | |||
! style="background-color:#eaeaea;border:1px solid #000;padding:5px;" |Wert | |||
! style="background-color:#eaeaea;border:1px solid #000;padding:5px;" |Kommentar | |||
|- | |||
| style="border:1px solid #000;padding:5px;" |date.timezone | |||
| style="border:1px solid #000;padding:5px;" |"Europe/Berlin" | |||
| style="border:1px solid #000;padding:5px;" |Select the appropriate [https://www.php.net/manual/en/timezones.php time zone] for you.<br />Uncomment the entry | |||
|- | |||
| style="border:1px solid #000;padding:5px;" |max_execution_time | |||
| style="border:1px solid #000;padding:5px;" |600 | |||
| style="border:1px solid #000;padding:5px;" | | |||
|- | |||
| style="border:1px solid #000;padding:5px;" |post_max_size | |||
| style="border:1px solid #000;padding:5px;" |1024M | |||
| style="border:1px solid #000;padding:5px;" | | |||
|- | |||
| style="border:1px solid #000;padding:5px;" |upload_max_filesize | |||
| style="border:1px solid #000;padding:5px;" |1024M | |||
| style="border:1px solid #000;padding:5px;" | | |||
|- | |||
| style="border:1px solid #000;padding:5px;" |opcache.enable | |||
| style="border:1px solid #000;padding:5px;" |1 | |||
| style="border:1px solid #000;padding:5px;" |Uncomment the entry | |||
|- | |||
| style="border:1px solid #000;padding:5px;" |opcache.enable_cli | |||
| style="border:1px solid #000;padding:5px;" |0 | |||
| style="border:1px solid #000;padding:5px;" |Uncomment the entry | |||
|- | |||
| style="border:1px solid #000;padding:5px;" |opcache.memory_consumption | |||
| style="border:1px solid #000;padding:5px;" |512 | |||
| style="border:1px solid #000;padding:5px;" |Uncomment the entry | |||
|- | |||
| style="border:1px solid #000;padding:5px;" |opcache.max_accelerated_files | |||
| style="border:1px solid #000;padding:5px;" |1000000 | |||
| style="border:1px solid #000;padding:5px;" |Uncomment the entry | |||
|- | |||
| style="border:1px solid #000;padding:5px;" |opcache.validate_timestamps | |||
| style="border:1px solid #000;padding:5px;" |1 | |||
| style="border:1px solid #000;padding:5px;" |Uncomment the entry | |||
|- | |||
| style="border:1px solid #000;padding:5px;" |opcache.revalidate_freq | |||
| style="border:1px solid #000;padding:5px;" |2 | |||
| style="border:1px solid #000;padding:5px;" |Uncomment the entry | |||
|- | |||
| style="border:1px solid #000;padding:5px;" |opcache.optimization_level | |||
| style="border:1px solid #000;padding:5px;" |0x7FFF9FFF | |||
| style="border:1px solid #000;padding:5px;" |Uncomment the entry | |||
|- | |||
| style="border:1px solid #000;padding:5px;" |opcache.blacklist_filename | |||
| style="border:1px solid #000;padding:5px;" |C:\bluespice\etc\opcache.blacklist | |||
| style="border:1px solid #000;padding:5px;" |Uncomment the entry | |||
|- | |||
| style="border:1px solid #000;padding:5px;" |zlib.output_compression | |||
| style="border:1px solid #000;padding:5px;" |On | |||
| style="border:1px solid #000;padding:5px;" | | |||
|- | |||
| style="border:1px solid #000;padding:5px;" |zlib.output_compression_level | |||
| style="border:1px solid #000;padding:5px;" |9 | |||
| style="border:1px solid #000;padding:5px;" |Uncomment the entry | |||
|} | |||
'''Save''' and close the file. | |||
'''Create''' the folder <code>C:\bluespice\etc</code> . | |||
'''Create''' a text file named <code>opcache.blacklist</code> content <code>C:\bluespice\var\www\w\extensions\BlueSpiceFoundation\config\*</code> | |||
'''Expand''' the tree in the left pane of the IIS Manager until the "Default Web Site" becomes visible: | |||
[[File:Setup:PHP_IIS_Config_14.png|center|400px|PHP and IIS 14|link=Special:FilePath/Setup:PHP_IIS_Config_14.png]] | |||
'''Right-click''' (1) and then '''click''' "Remove" (2): | |||
[[File:Setup:PHP_IIS_Config_15.png|center|400px|PHP and IIS 15|link=Special:FilePath/Setup:PHP_IIS_Config_15.png]] | |||
'''Confirm''' the following dialog with "Yes": | |||
[[File:Setup:PHP_IIS_Config_16.png|center|400px|PHP and IIS 16|link=Special:FilePath/Setup:PHP_IIS_Config_16.png]] | |||
'''Right-click''' "Sites" (1) and '''click''' "Add Website" (2): | |||
[[File:Setup:PHP_IIS_Config_17.png|center|400px|PHP and IIS 17|link=Special:FilePath/Setup:PHP_IIS_Config_17.png]] | |||
'''Enter''' the site name "BlueSpice" (1) and '''select''' the path on your server where your BlueSpice installation will be located later (2). | |||
'''Click''' "OK" (3): | |||
[[File:Setup:PHP_IIS_Config_18.png|center|400px|PHP and IIS 18|link=Special:FilePath/Setup:PHP_IIS_Config_18.png]] | |||
{{Hint|file=hint.png|text=This documentation assumes the [[Setup:Installation Guide/Advanced/Windows_Folder_Structure|recommended folder structure]]. If the path you specify here does not yet exist, please create it before clicking "OK".}} | |||
The site is now listed in the IIS overview page: | |||
[[File:Setup:PHP_IIS_Config_19.png|center|400px|PHP and IIS 19|link=Special:FilePath/Setup:PHP_IIS_Config_19.png]] | |||
==Next step== | ==Next step== | ||
If you have successfully completed all of the above steps, proceed to the next step: [[Setup: Installation Guide/System Preparation/Windows/MariaDB | MariaDB]]. | |||
[[en:{{FULLPAGENAME}}]] | |||
[[de:Setup:Installationsanleitung/Systemvorbereitung/Windows/PHP]] | |||
Revision as of 07:50, 11 March 2022
 |
The source code of BlueSpice is based on the scripting language "PHP". It must be installed on your server in order to operate BlueSpice. The steps listed here are required. |
 |
PHP is not installed with a "classic installation package" but the sources are downloaded and integrated into IIS via the PHP Manager that you installed in the previous step. |
Download
|
The content of this section refers to external sources and is current at the time of writing this documentation. We cannot guarantee how long these sources will remain unchanged. Please let us know if you notice any discrepancies to the information provided here. |
Open the officical download page for Windows auf php.net (1).
Find the currently most recent version 7.4.x (2) 64-bit Non Thread Safe (3) and download it (4):
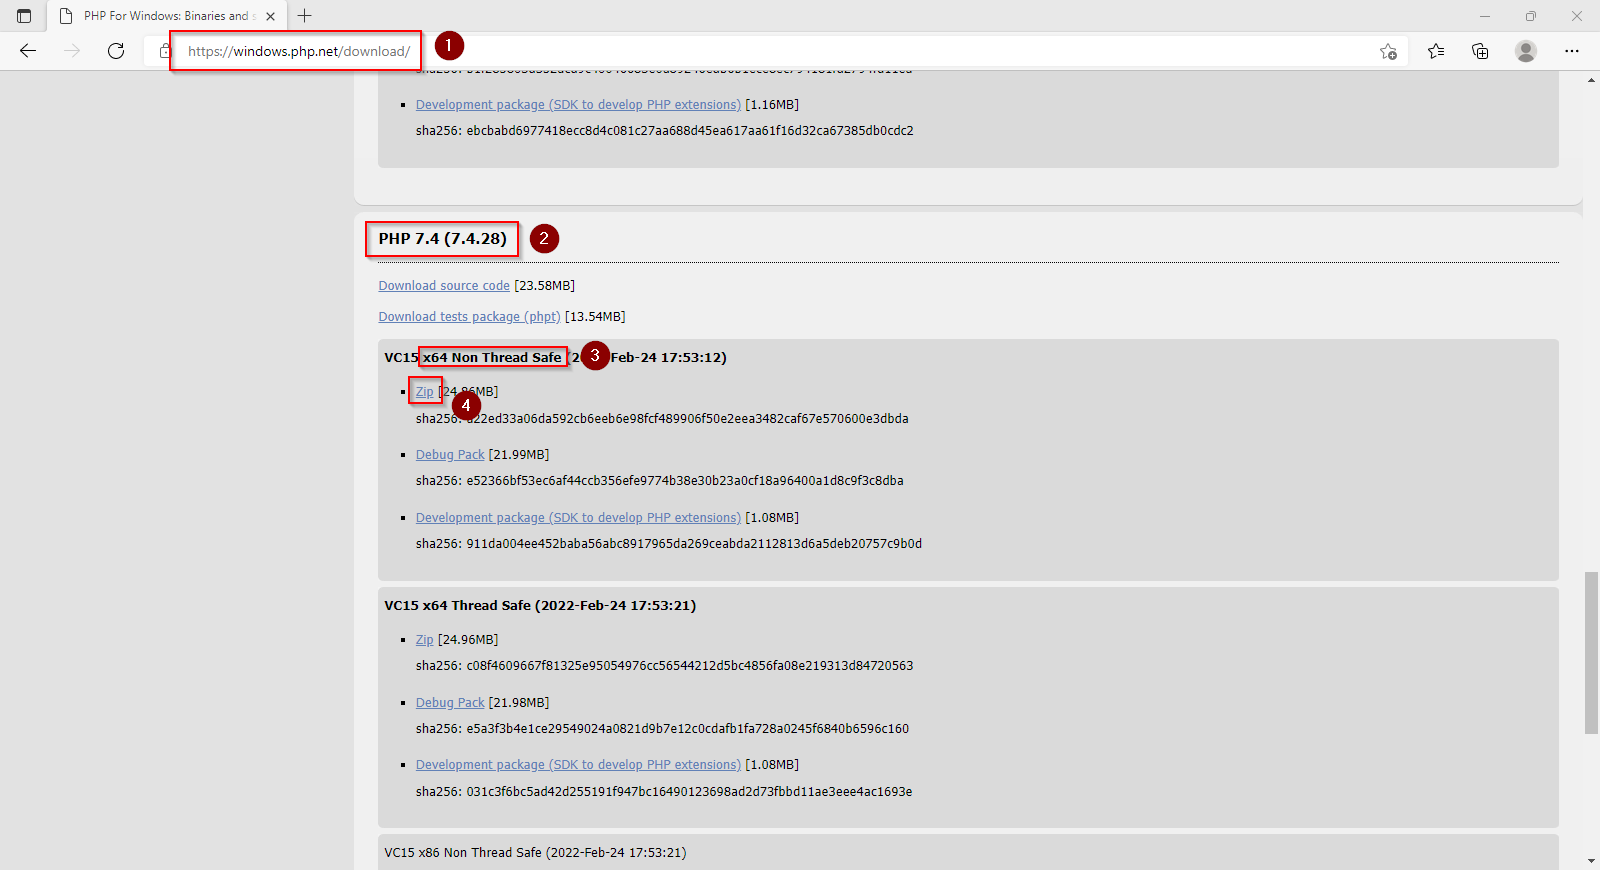
Follow the download instructions.
|
Please note that BlueSpice is not compatible with PHP 8.x at this time. |
|
In the following steps, we use PHP-Version 7.4.28 which only serves as an example for the latest version 7.4.x that is available at the time of your download. |
Unpacking the zip-archive
Unpack the ZIP archive that you just downloaded into a useful system path on your hard drive.
|
This documentation assumes the recommended folder structure.
For this reason PHP will be unpacked into the folder C:\bluespice\bin\php-7.4.28. If you have a different folder structure, you must adapt these paths accordingly. |
Setting the environment variable
To use PHP easily on the command line of Windows, it is necessary to configure an environment variable in Windows. Perform the following steps:
Enter the key combination Windows+R.
Enter "SystemPropertiesAdvanced.exe" (1) in the dialog window and click "OK" (2):
Click "Environment Variables...":
Double-click the entry "Path" in the section "System variables":
Click "New":
Add the path to your unpacked PHP version, which contains the php.exe file:
Close all newly opened windows one after the other by clicking "OK".
Checking the environment variable
To make sure the environment variable is set correctly, perform the following steps:
Enter the key combination Windows+R.
Enter "cmd" (1) in the dialog window and click "OK" (2):
The command prompt opens.
Type "php -v" (1) and press the Enter key. The found PHP version will be displayed (2).
If this is not the case, then the path to the php.exe file in the environment variables was specified incorrectly.
Configuring IIS for PHP
In the following steps, PHP will be included in IIS and IIS will be configured to provide a working basic setup:
Press the key combination Windows+R to call up IIS Manager.
Enter "inetmgr" (1) in the dialog window and click "OK" (2):
Select your server name (1) in the left pane and then double-click "PHP Manager" (2):
Click "Register new PHP version":
Select the browse "(...)" button in the next window:
Change to the path to which you previously unzipped PHP (1), mark the "php-cgi.exe" (2) and click "Open" (3):
Click "OK":
Click "Configure error reporting":
Select the item "Production machine" (1) and enter a path and a file of your choice where PHP should save its log (2). Click "Apply" (3):
|
This documentation assumes the recommended folder structure. If the path you specify here does not yet exist, please create it before clicking "Apply". |
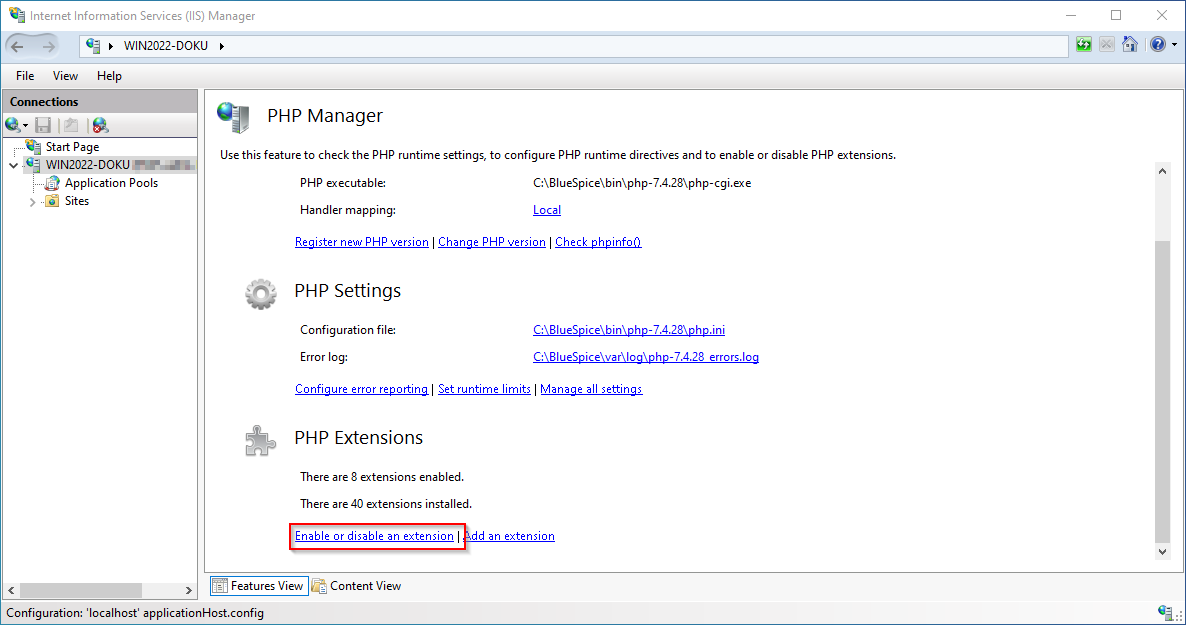
Click "Enable or disable an extension" in the main window:
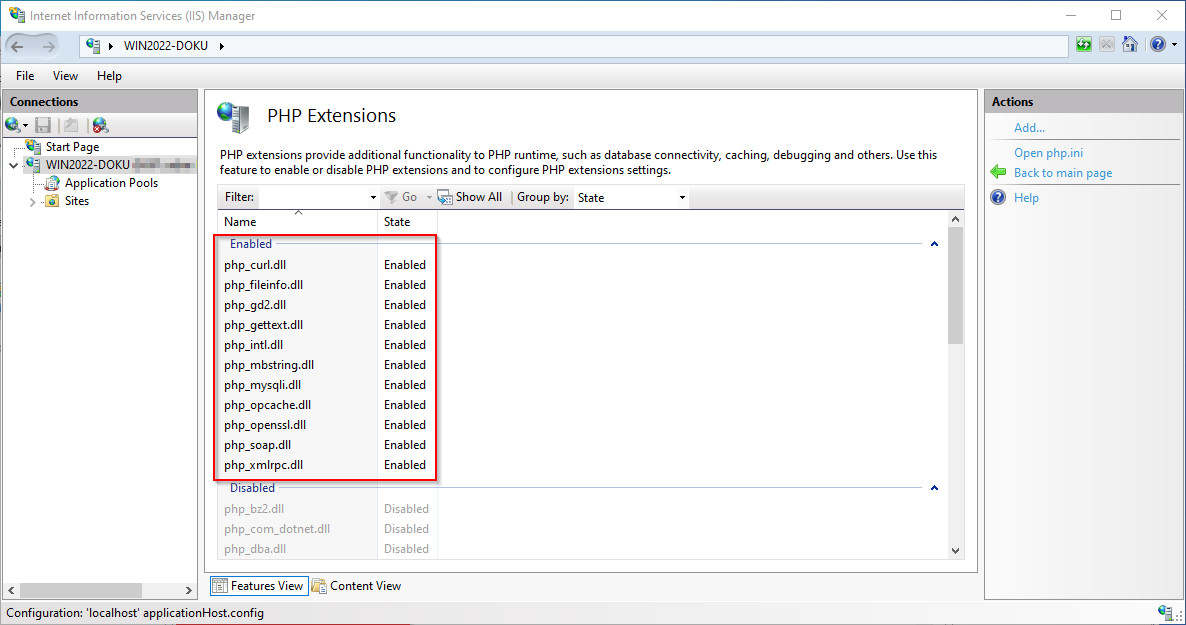
Make sure that the following extensions are activated:
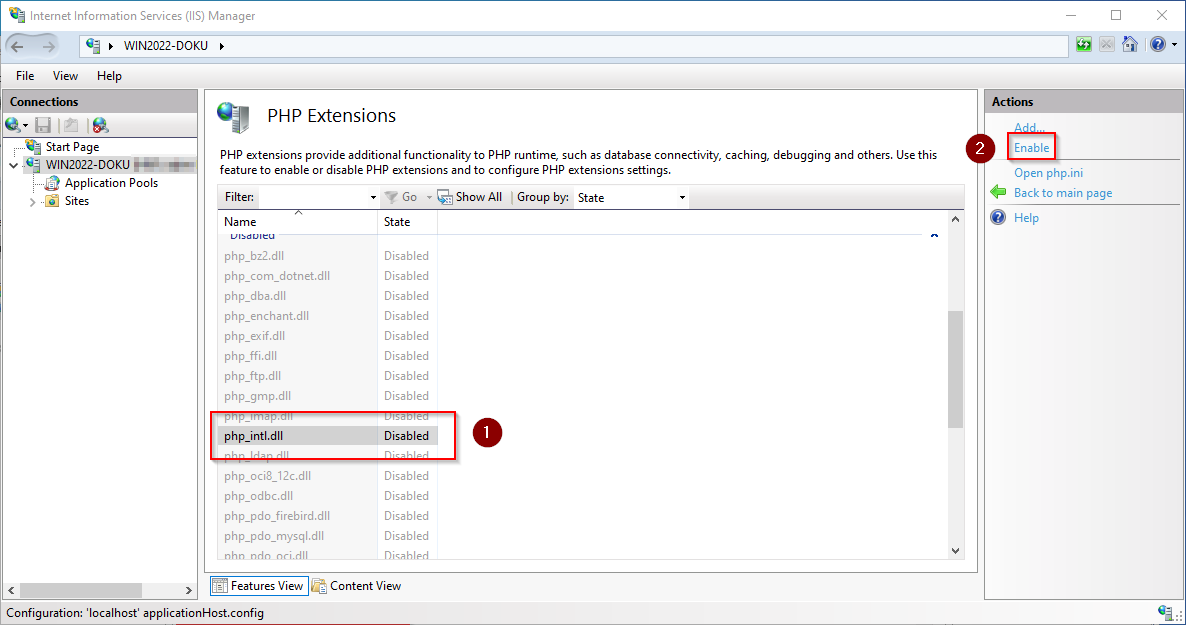
To activate an extension, find it in the "Disabled" extensions (1) and click "Enable" (2):
Open the configuration file php.ini:
Replace the line extension=php_opcache.dll with zend_extension=php_opcache.dll:
Change the following options to the values below:
| Name | Wert | Kommentar |
|---|---|---|
| date.timezone | "Europe/Berlin" | Select the appropriate time zone for you. Uncomment the entry |
| max_execution_time | 600 | |
| post_max_size | 1024M | |
| upload_max_filesize | 1024M | |
| opcache.enable | 1 | Uncomment the entry |
| opcache.enable_cli | 0 | Uncomment the entry |
| opcache.memory_consumption | 512 | Uncomment the entry |
| opcache.max_accelerated_files | 1000000 | Uncomment the entry |
| opcache.validate_timestamps | 1 | Uncomment the entry |
| opcache.revalidate_freq | 2 | Uncomment the entry |
| opcache.optimization_level | 0x7FFF9FFF | Uncomment the entry |
| opcache.blacklist_filename | C:\bluespice\etc\opcache.blacklist | Uncomment the entry |
| zlib.output_compression | On | |
| zlib.output_compression_level | 9 | Uncomment the entry |
Save and close the file.
Create the folder C:\bluespice\etc .
Create a text file named opcache.blacklist content C:\bluespice\var\www\w\extensions\BlueSpiceFoundation\config\*
Expand the tree in the left pane of the IIS Manager until the "Default Web Site" becomes visible:
Right-click (1) and then click "Remove" (2):
Confirm the following dialog with "Yes":
Right-click "Sites" (1) and click "Add Website" (2):
Enter the site name "BlueSpice" (1) and select the path on your server where your BlueSpice installation will be located later (2).
Click "OK" (3):
|
This documentation assumes the recommended folder structure. If the path you specify here does not yet exist, please create it before clicking "OK". |
The site is now listed in the IIS overview page:
Next step
If you have successfully completed all of the above steps, proceed to the next step: MariaDB.